Uploading Projects
With the Riverscapes Viewer for QGIS you can upload riverscapes projects into the Riverscapes Data Exchange. This feature is intended for uploading a single riverscapes project at a time. You should use the Riverscapes Command Line Interface (rscli) if your goal is to upload more than a handful of projects. The uploader can be used both to upload a new project, or to make changes to an existing project. It allows selective uploading of specific files.
This feature is only available in Riverscapes Viewer for QGIS. It is not available in the ArcGIS or ArcGIS Pro versions of the Viewer.
See the networking requirements at the bottom of this page if you experience problems with this feature or the Viewer fails attempting to upload data.
Before You Begin
This feature requires that you have the following:
- A Riverscapes account. Visit the Riverscapes Data Exchange and create one first if you don't have one already. See also help on creating an account on our documentation site.
- A valid Riverscapes compliant project. This can be a new project that you have created, either by hand or using a tool such as Riverscapes Studio. Or it could be a project that you or someone else has downloaded from the Data Exchange and altered in some way; perhaps you have edited some data or performed quality control.
Getting Started
- Open the project you want to upload with the Riverscapes Viewer.
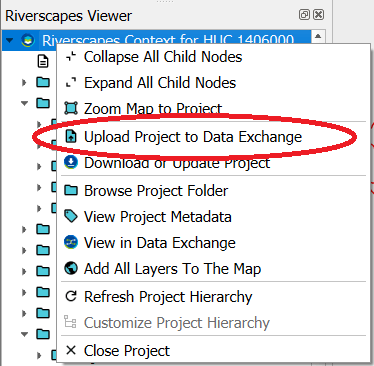
- Right click on the project node in the Riverscapes Viewer pane and choose
Upload Project to Data Exchange.
A web browser will open and you will be prompted to login to the Riverscapes Data Exchange. After you have successfully logged in, focus will return to QGIS and the project upload form.
Step 1: Basic project settings
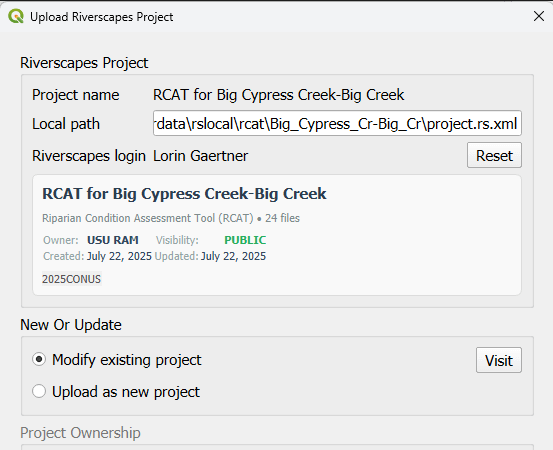
In the first step, the uploader checks if the project already exists on the Riverscapes Data Exchange. This uses the embedded <Warehouse> tag in the project.rs.xml.
- Project Verification: The project name and local path are shown at the top. ALWAYS check that both these fields are correct!
If the project already exists on the Data Exchange, some details about the project from the Data Exchange (such as project Owner, Visibility, Date Created and Date last Updated) will be shown. A button to Visit the project on the web is enabled.
- New or Update Project: If your project originated from the Data Exchange, you can choose
Modify existing projectorUpload as new project.
If the project does not already exist on the Data Echange, your only option is to Upload as new project.
Next, you can configure the project Ownership, Visibility, and Tags.
- Project Ownership: Choose whether to assign the project to an organization or your personal account.
- Visibility: Pick PUBLIC, PRIVATE, or SECRET. This is only available for new projects.
- Tags: Add descriptive tags to help others find your project.
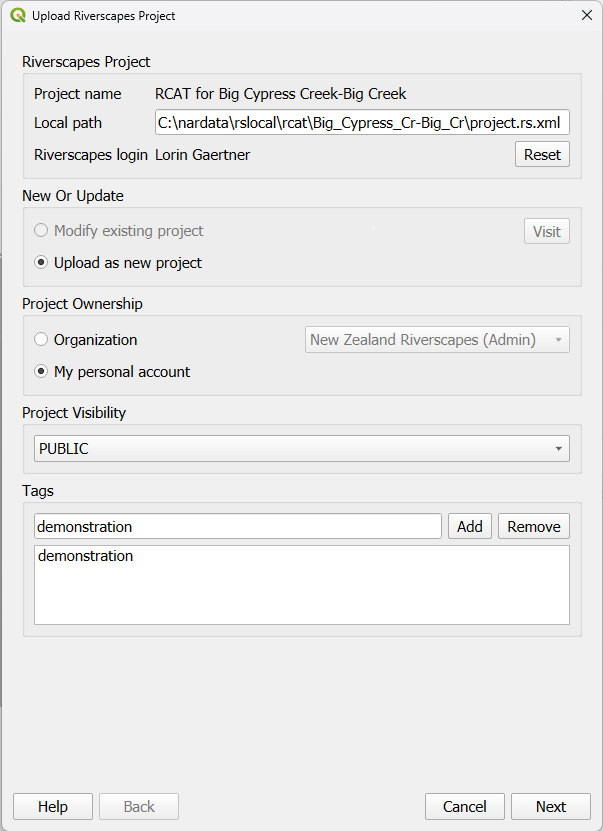
Click Next to proceed to file selection.
Step 2: File Selection
In the second step, you will see a list of all files in your project, their size, and their status relative to the Data Exchange. For each file you can choose what happens with it, depending on its Status:
- New Files that don't exist on the Data Exchange yet. These will be uploaded if the checkbox is selected.
- No change Files that already exist on the Data Exchange. These will be left on the server if the checkbox is selected, but will be deleted if the checkbox is deselected.
- Update Files that have changed locally and need to be re-uploaded. They will be uploaded if the checkbox is selected.
- Delete Files that exist on the Data Exchange but not locally. These will be removed from the data exchange only if the checkbox is selected and the option "Delete remote files that are not present locally" is also selected.
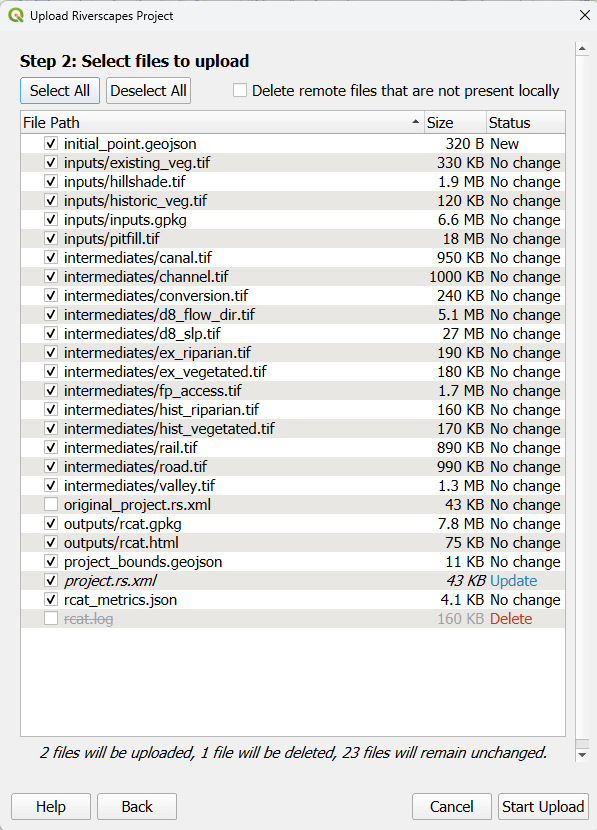
Review the list carefully and check the summary of what will be changed at the bottom to ensure it matches your expectations. In the screenshot above:
- the 2 files that will be uploaded are
initial_point.geojson(status New) &project.rs.xml(status Update) - the 1 file that will be deleted is
original_project.rs.xml(status No change)! rcat.log(status Delete) will not be removed from the server because "Delete remote files that are not present locally" is unchecked.
Click Start Upload to begin the process.
Notes
Modifying an existing project in the Data Exchange is permanent and cannot be undone.
- For projects that originated from the Data Exchange, a comprehensive file hash check, essentially a digital fingerprint, to determine which files have changed relative to those that already exist online. To save time and bandwidth, only files that have changed and are selected are uploaded.
- Simply opening a GeoPackage layer in QGIS can sometimes alter the file's digital fingerprint on your disk. This happens because QGIS and its underlying database enginge (SQLite) perform minor 'housekeeping" tasks, such as updating timestamps, the moment a file is accessed. With any change, no matter how small, the uploader will flag these GeoPackages as changed (Status: Update), even if you didn't edit any data. You can choose whether or not to upload these modified files.
Step 3: Upload Status
The final step shows the progress of your upload.
- Upload Status A progress bar and detailed status labels show you which file is being uploaded and how much is remaining.
- Logs: You can click
View Logat any time to see a detailed technical log of the upload process. - Completion: Once finished, the status will show "Upload complete".
Click View in Data Exchange to see your project online.
Video Demonstration
This video demonstrates uploading a project to the Data Exchange using the Viewer (ver 1.1 / 2026-February).
Networking Requirements
The download feature makes POST requests to https://api.data.riverscapes.net via port 443 as well as GET requests over port 80.
Contact your IT administrator if the download feature fails with HTTPS warnings. You might need to request that your IT administrator configures your network to allow communication to api.data.riverscapes.net over port 443.