Business Logic
Introduction
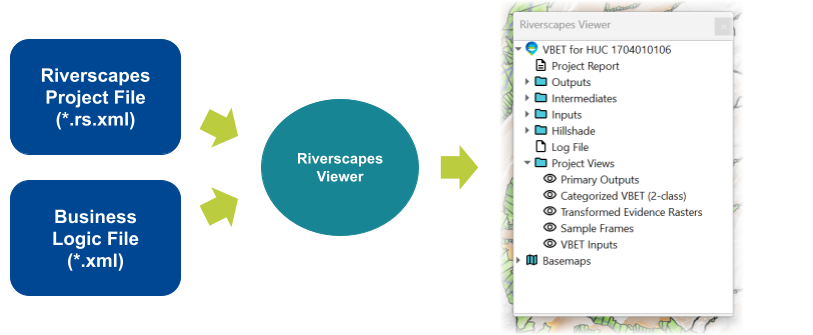
The purpose of the business logic is to translate riverscapes projects and determine how they should be displayed in the Viewer project explorer. In other words, the Riverscapes project file defines what layers exist within a project, while the business logic file defines how these layers should be organized within the project explorer tree and be displayed when added to map.
The Riverscapes Viewer comes pre-loaded with business logic for Riverscapes Consortium registered models and tools. Typically there is one business logic file for each type of Riverscapes project (e.g. BRAT, VBET, GCD, etc.). But it is also possible to have one or more custom business logic file(s) for a single project type. This allows users to have different views of a single project type. For example, you might have one version of business logic used during development and another for reviewing projects with clients. If you need this ability see the custom business logic and search folders sections below.

Where does the Viewer Look for Business Logic Files?
Business Logic uses files on your computer located in a folder called RAVE. The name of this folder refers to the previous name for Riverscapes Viewer that used the acronym RAVE (Riverscapes Analyst Viewer and Explorer).
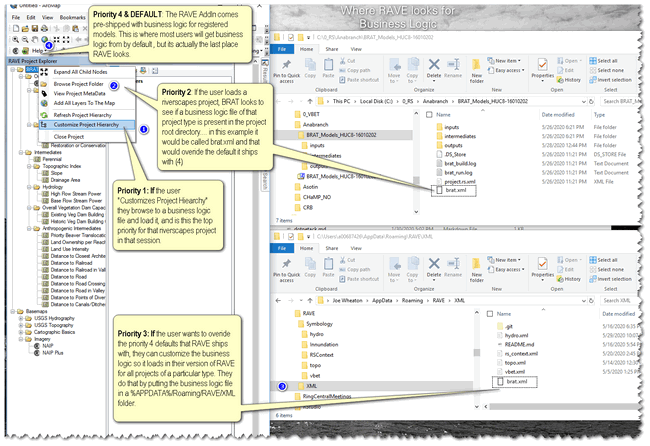
When the Viewer attempts to load a Riverscapes project it looks in three locations to find an appropriate business logic XML file. The search order it uses is:
- User-loaded from Customize Project Hierarchy command (Priority 1)
- In the root directory of the current project (Priority 2)
- Local user default over-ride for that project type (Priority 3)
- Default that ships with that version of the Viewer (Priority 4) - Note that you should always make sure you have the latest version of the Viewer as default symbology and business logic updates are published in new releases.
The Viewer uses the first business logic file that it finds that contains the same project type specified at the top of the business logic file. Note that Priorities 2 & 3 represent user customization and Priority 1 is where the user can manually load business logic with the Customize Project Hierarchy command (see below). See the symbology page for how to locate your APPDATA folder.
| Search Folder | Example | Priority |
|---|---|---|
| In root directory of current riverscapes project file. | D:\MyProjects\my_downloaded_project\BRAT.xml | Priority 2 |
%APPDATA%\RAVE\RaveBusinessLogic | %APPDATA%\RAVE\RaveBusinessLogic\BRAT.xml | Priority 3 |
Loading Custom Business Logic
You can load a custom business logic file stored in a location on your computer other than the search folders described above by choosing the Customize Project Hierarchy option after right clicking on the project in the project explorer.
Customizing Business Logic & Refreshing the Project Explorer
You can customize the business logic XML file while ArcMap and QGIS are in use, providing that the business logic file in question is either adjacent to the Riverscapes project file or in the APPDATA folder. WARNING - the business logic is written in XML and is fiddly (see these instructions). Make small changes locally incrementally (either in Priority 2 or 3 locations on disc), and frequently refresh and test within the Viewer.
- Locate the business logic file you wish to use and open it in any text editor (we strongly recommend following these instructions for editing and authoring riverscapes XML in Visual Studio Code so that it validates your XML).
- Make the desired changes to the business logic XML.
- Save the business logic XML file (to project for Priority 2, or to
%APPDATA%\RAVE\XML\for Priority 3). - Right click on the project node in the Viewer project explorer and choose "Refresh".
Business Logic Definition
Here is an example of a business logic file for VBET projects:
<?xml version="1.0" encoding="utf-8"?>
<Project xmlns:xsi="http://www.w3.org/2001/XMLSchema-instance"
         xsi:noNamespaceSchemaLocation="http://xml.riverscapes.net/RaveBusinessLogic/XSD/project_explorer.xsd">
  <Name>VBET</Name>
  <ProjectType>VBET</ProjectType>
  <Node xpathlabel="Name">
    <Children>
      <Repeater label="Realizations" xpath="Realizations/VBET">
        <!--This is a template for how each realization should render-->
        <Node xpathlabel="Name">
          <Children collapsed="false">
            <Node label="Inputs" xpath="Inputs">
              <Children>
                <Node label="Topography" xpath="Topography">
                  <Children>
                    <Node xpathlabel="Name" xpath="DEM" type="raster" symbology="DEM"/>
                    <Node xpathlabel="Name" xpath="Flow" type="raster" symbology="Flow"/>
                    <Node xpathlabel="Name" xpath="Slope" type="raster" symbology="SlopePer"/>
                  </Children>
                </Node>
                <Repeater label="Network Buffers" xpath="DrainageNetworks/Network/Buffers/Buffer">
                  <Node xpathlabel="Name" type="vector" symbology="DEMO_singlefill"/>
                </Repeater>
              </Children>
            </Node>
            <Node label="Analyses"/>
          </Children>
        </Node>
      </Repeater>
    </Children>
  </Node>
</Project>
By layering the various building blocks together you can build a wide variety of tree structures.
<Project>
The Project is the required root element for every Riverscapes business logic XML file. It defines the project and references the schema for validation. Always start your file with:
<?xml version="1.0" encoding="utf-8"?>
<Project xmlns:xsi="http://www.w3.org/2001/XMLSchema-instance"
         xsi:noNamespaceSchemaLocation="http://xml.riverscapes.net/RaveBusinessLogic/XSD/project_explorer.xsd">
The end of your file should contain the closing </Project> tag for the element.
This ensures your XML is recognized and validated against the correct schema.
<Repeater>
Repeaters can contain <Node> types. The <Node> inside a will be applied to each repeated element found inside that repeater's xpath results.
Repeaters have one attribute: xpath that you can use to specify the object that is repeated in the project xml.
<Children>
Children can contain <Node> and <Repeater> elements. They can only be used inside <Node> elements.
They have one optional attribute: collapsed="true/false" which determines if this group is collapsed by default upon load.
<Node>
Node Sub-Elements
<Children>: This node can have sub-nodes<TileService>: (optional) If your node is a tile service (type="tile") then put its url here
Node Attributes
Choose one of:
label: The literal string you want to assign to this node as a labelxpathlabel: if you don't uselabeland you want to look up your node label from theproject.rs.xmlfile you can do it this way
The following are optional:
type: If you want your node to be added to the map you need to specify what its type is. See the "Node Data Types" section below for allowed values.symbology: If this is a map layer you can specify what symbology to use. This must match theNAMEvariable from the python symbology plugin inRiverscapesToolbar/symbology/plugins/myplygin.pyxpath: Not to be confused withxpathlabel. This xpath sets the context for this node (see below). Children nodes will inherit it.filter:transparency:
Connecting a business logic node to a project layer
In Riverscapes business logic XML files (e.g., BRAT.xml), the xpath attribute of a Node element specifies the path to a data layer in the corresponding project XML (i.e., project.rs.xml). This path tells the application which layer to display or use in a given view.
For more information about XPath see XPath Syntax at w3schools.com.
Example
In BRAT.xml:
<Node label="Existing Dam Capacity" xpath="Geopackage/Layers/Vector[@id='BRAT_RESULTS']" type="line" symbology="oCC_EX_filtered" id="ex_capacity" />
In project.rs.xml, the referenced layer would look like:
<Geopackage id="OUTPUTS">
  <Layers>
    <Vector lyrName="BRAT_RESULTS">
      <Name>BRAT Results</Name>
      <!-- ... -->
    </Vector>
  </Layers>
</Geopackage>
Here, the xpath in BRAT.xml points to the Vector layer with lyrName="BRAT_RESULTS" inside the Geopackage with id="OUTPUTS" in project.rs.xml. This linkage allows the business logic to reference and display the correct data layer from the project file
Node Data Types
Nodes can have different data types which affect how (if) the node loads into the map.
raster: tif filespoint: a vector file (e.g. geopackage layer) with pointsline: a vector file with linespolygon: a vector file with polygonstile: A urlreport: usually an html file that describes the project and how it was generatedfile: catch-all for any other kind of file. Right now this will just open up finder/explorer to this location.
Project Views
The business logic file can define groups of layers that can be loaded into the map as a "view". These are useful if there are common or default ways of viewing the contents of a project. Each business logic file can define multiple views, but only one can be designated the "default view". The default view is loaded automatically into the current ArcMap document when the project is loaded (if that option is selected in the Viewer settings). Currently, project views cannot refer to basemap layers, because these are not defined in the business logic XML.
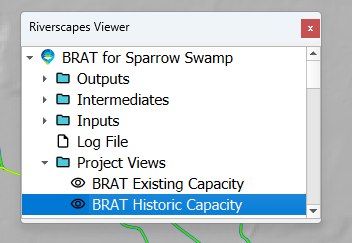
The following business logic example for BRAT renders as the user interface tree shown below.
<Views default="BRAT_exOutputs">
    <View name="BRAT Existing Capacity" id="BRAT_exOutputs">
      <Description>This view is the existing dam capacity</Description>
      <Layers>
        <Layer id="hillshade" />
        <Layer id="ex_capacity" />
      </Layers>
    </View>
    <View name="BRAT Historic Capacity" id="BRAT_hisOutputs">
      <Description>This view is the historic dam capacity</Description>
      <Layers>
        <Layer id="hillshade" />
        <Layer id="his_capacity" />
      </Layers>
    </View>
</Views>

Views element
The Views element should appear inside the top level Project element. Its only attribute is default that identifies the id of the project view that is considered the default project view.
View
Each view has a name attribute that contains the display name that will be used for the view in the user interface, as well as an id attribute, which is what is used to select it as default, if desired.
It may have a Description element and must have a Layers element. The Layers element in turn contains individual Layer elements.
Layer
Each Layer is a reference to a Node element within the project xml. A layer can refer to any node, including group nodes that have children. Layer elements have an id attribute that corresponds to the id attrribute of the project node to which it refers. The optional visible attribute is available for future use (not yet implemented) to control whether the layer is turned on for display when it is added to the map.
Video Demonstration
Sharing your Business Logic with Someone Else
If you have customized and/or authored your business logic, you have three main options for sharing your work with others.
Option 1: Package up with a Riverscapes Project
Most users will have no idea what business logic is. If you have customized business logic for a specific Riverscapes Project, the easiest way to share it with someone else is to ship them your riverscapes project with the customized business logic in the root of the project directory (as well as the *.lyr layer files the symbology keys point to). This video illustrates an example of this:
Option 2: Update their Local Defaults
For an advanced user, you can send them the *.xml business logic file and corresponding *.lyr layer files the symbology keys point to, and then instruct them as follows:
- Place the
*.xmlbusiness logic file in the%APPDATA%\RAVE\RaveBusinessLogicfolder. (They may need to create this folder if it does not exist). - Place all the
*.lyrlayer file(s) in the%APPDATA%\RAVE\Symbology\esri\[NAME]folder where[NAME]is the same case and name as the project type (e.g. forbrat.xmlbusiness logic this would be a subfolder of namebrat. Note, they may need to create thisSymbologyfolder if it does not exist. - Load a riverscapes project, or if a project is already loaded Refresh Project Hierarchy tree.
This video illustrates how this works:
Option 3: Suggesting a New Default Business Logic for Existing or New Riverscape Project Type
If you would like the Riverscapes Consortium development team to consider your business logic updates and symbology updates for the next release of the Viewer, propose a pull request to the Riverscapes XML repository. If you are part of the Riverscapes Consortium development team, you can do this by making a local branch, making your commits and pushes to that branch (name it something logical like ProposedSymbologyMyModel) and then log a pull request and ask for a review. If you are not part of the development team, you can fork the repo, make your changes on your own repo and then submit a pull request. This request will be reviewed by the development team and they may ask for fixes after testing it. If accepted, this will be merged into the main branch and reflected in the next release.
