Riverscapes Viewer for QGIS
The QGIS Version of the Riverscapes Viewer is a free plugin for QGIS that helps display riverscapes projects with consistent symbology and labeling. This help guide will help you get started with the Riverscapes Viewer.
Getting Started
If you have not already installed the Riverscapes Viewer plugin, you can do so by following the instructions on the installation page.
The Viewer plugin provides a toolbar, a project explorer panel, and a metadata panel. The toolbar contains a menu with buttons for loading projects and supporting resources, along with a small handfull of related tools. The project explorer panel contains a tree view of the project layers, and provides the main way to add layers to the map.
After you have installed the plugin, locate the toolbar in QGIS. If the toolbar is not visible, use the QGIS View → Toolbars menu and check the box next to Riverscapes Viewer to make it visible.
Toolbar
The Riverscapes Viewer Toolbar contains the following:
- Open Riverscapes Project: Open a riverscapes project and load it into the project explorer dockable panel. Details below.
- Open Remote Project: 🆕 Open a project from the Riverscapes Data Exchange without downloading a local copy. See remote projects for more detail.
- Close All Riverscapes Projects: Close all currently open projects within the project explorer dockable panel.
- Browse Data Exchange Projects in Map Area: Opens your web browser to the Riverscapes Data Exchange page showing projects within the current map extent.
- Download Riverscapes Project: 🆕 Download a project, with option of selecting individual files, from the Riverscapes Data Exchange to your local computer. See Downloading Projects page for details.
- Show Riverscapes Viewer Panel: Show or Hide the Riverscapes Viewer project explorer dockable panel. This does not open or close projects, it only shows (if not visible) or hides (if already visible) the panel.
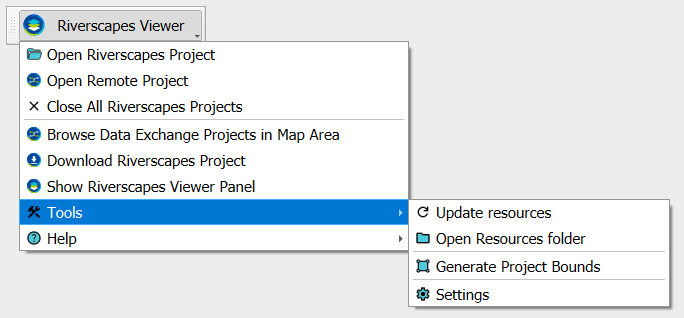
- Tools sub-menu:
- Update Resources: Update the business logic and symbology resources for the Riverscapes Viewer.
- Open Resources Folder: Open the folder on your computer where the Riverscapes Viewer resources are stored.
- Generate Project Bounds: Generate a centroid, bounding box, and polygon extent to use for creating a new riverscapes project.
- Settings: Open the Riverscapes Viewer settings dialog to change options. See settings section below.
- Help sub-menu:
- Riverscapes Viewer Online Help: Links to this page so you can get information and help on using the Riverscapes Viewer as well as updating resources that come with the software.
- About Riverscapes Viewer: View the installed version information and links to the software issues, change log, and acknowledgements
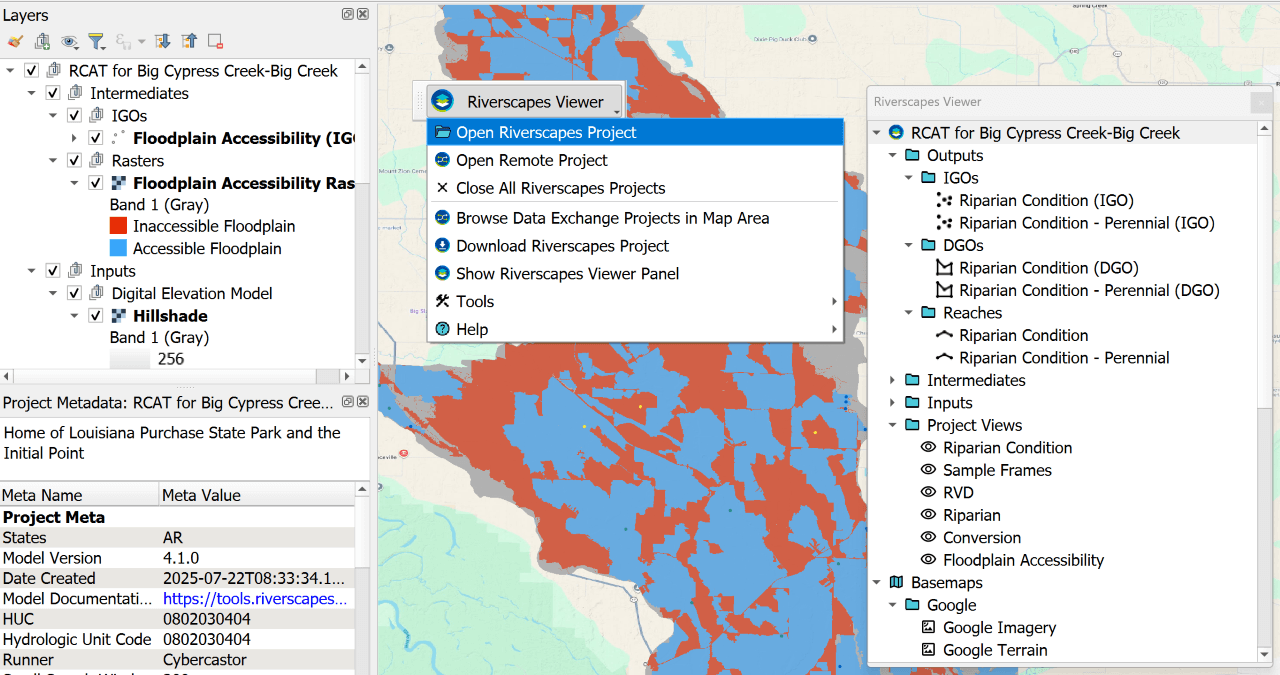
Open a Project
Click on Open Riverscapes Project under the Riverscapes Viewer menu to open a Riverscapes project previously saved to your computer. This will open a file dialog where you can select a project file. The project file is a *.rs.xml file that defines the project layers.
After the selecting file, the project will be loaded into the project explorer panel. If the project type possesses a default project view it will be loaded into the map.
Project Explorer Panel
The project explorer panel displays a tree view of the Riverscapes Project with its layers, datasets and files, and Project Views. The Panel also has a common set of Basemaps (adjustable in Settings). Right clicking on nodes within the project explorer panel will provide additional options for interacting with the project and its layers, depending on the context.
Panel tree context menus
Every element within the panel tree has useful options presented in a context menu by right clicking on the element, as described below.
Project context menu
Right click on the project name for the following options as shown:
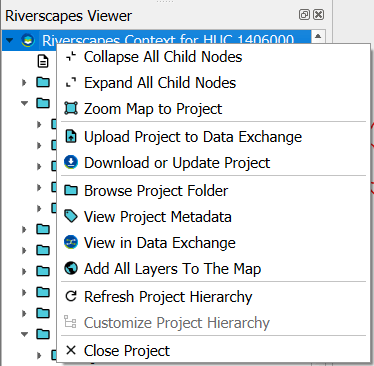
- Collapse All Child Nodes/Expand All Child Nodes: Collapse or expands the nodes of the project tree/
- Zoom Map to Project: Zooms the QGIS map view to the extent of the Project as defined by the bounding box in the
project.rs.xml(for local projects) or the project_bounds.geojson (for remote projects). - Upload Project to Data Exchange: Upload the project to the Riverscapes Data Exchange. See the Uploading Projects page for more information.
- Download or Update Project: Download the project or selected files from the project on the data exchange to a local folder. See the Downloading Projects page for more information.
- Browse Project Folder: Open the folder on your computer where the project files are stored.
- View Project Metadata: View information about the project in the metadata panel. See the Metadata Panel section for more information.
- View Project in Data Exchange: Open your web browser to the Riverscapes Data Exchange page for this project (if it has been uploaded).
- Add All Layers to Map: Add all layers in the project to the QGIS map.
- Refresh Project Hierarchy: Reload the project file and update the project explorer panel.
- Close Project: Close the project and remove it from the project explorer panel.
Layer and Dataset Nodes context menu
- Add Layer to Map: Add the selected layer to the map.
- View Layer Metadata: View information about the layer in the metadata panel. See the Metadata Panel section for more information.
- Browse Folder: Open the folder on your computer where the layer files are stored.
View Nodes context menu
- Add View to Map: Add the selected project view to the map.
Folder Nodes context menu
- Collapse/Expand All Child Nodes: Collapse or expand all child nodes within the folder.
- Add All Layers to Map: Add all layers within the folder to the map.
Project Layers
To add layers to the map, simply double click them in the project explorer panel. They will be added to the map in a structure that reflects the project explorer panel (and is defined in the business logic for this project type).
Project Views
Project views are predefined, curated views that can be added to the map with a single click. They allow for quickly adding the more popular ways of viewing a specific project type. Project views are defined in the business logic for the project type.
Base Layers
The Riverscapes Viewer comes with a collection of web map base layers that can be added to the map. Expand the basemap node in the project explorer panel and double click the layer you want to add to the map.
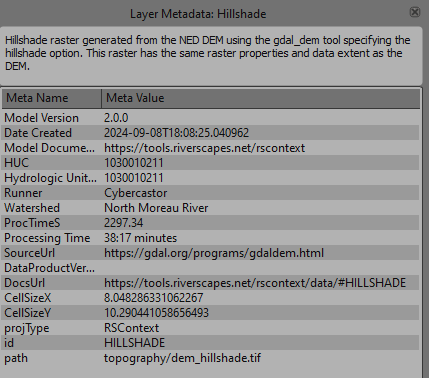
Metadata Panel
The Metadata panel displays information about the project and its layers, accessed by right clicking on the project or layer in the project explorer panel and choosing "View Project Metadata" or "View Layer Metadata". When the panel is opened, it will display metadata for the selected project or layer. You can change the displayed metadata by clicking on different projects or layers in the project explorer panel.
The top section of the metadata panel displays a description of the project or layer. The bottom section displays a table of metadata fields and their values.
 .
.
Settings
The Riverscapes Viewer has a number of options that can be set in the Settings dialog. To open the options dialog, from the Riverscapes toolbar choose Tools → Settings.

The settings dialog allows you to set the following options:
- Choose to include or exclude basemaps from the project explorer panel.
- Specify the region for certain basemaps. Currently the region options are "United States" and "New Zealand".
- Choose to automatically update resources when the Riverscapes Viewer is first loaded.
- Choose to enable or disable opening of the default project view when a project is opened.
- Select the default docking location for the Riverscapes Viewer project explorer panel.
- (Advanced users) Specify a Local Business Logic folder to override the default business logic that comes with the Riverscapes Viewer. This is useful for testing new business logic files.
Use the Reset button to reset all settings to their default values.
To save your changes, click the Apply button. To close the dialog without saving changes, click the Cancel button.
Settings are saved between QGIS sessions.
Updating resources
You can update the business logic and symbology for the Riverscapes Viewer by choosing Tools → Update resources from the toolbar. This will download the latest versions of these resources and place them on your computer in the correct location.
This operation will report the number of successfully updated files in the QGIS message panel.
Generate Project Bounds
The Riverscapes Viewer can help you generate a centroid, bounding box, and polygon extent for use when creating a new riverscapes project. To do this, first make sure you have your desired polygon layer in the map, and any desired features selected, then choose Tools → Generate Project Bounds from the toolbar.
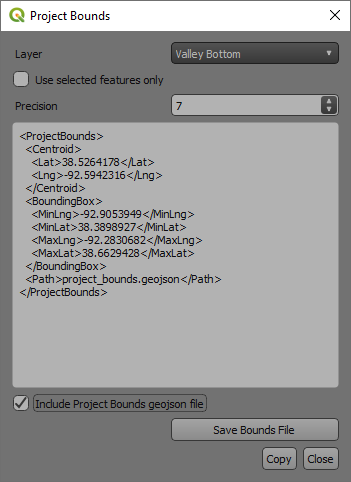
In the Project Bounds dialog:
- Make sure the correct polygon layer is selected in the dropdown, and click the Use Selected Features Only checkbox if you want to use only the selected features in the layer.
- Specify the precision (number of decimal places) for the output coordinates.
- Review the xml of the generated centroid and bounding box.
- If you want to generate the Project Bounds geojson file, click the Include Project Bounds geojson file checkbox, then click the "Save Bounds File" button to choose a location to save the file. The geojson file will be saved to the specified location and the reference will be included in the output xml.
- Copy the output xml to your clipboard by clicking the Copy button.
- You can then close the dialog by clicking the Close button.
Uploading Projects
You can upload projects to the Riverscapes Data Exchange by following the instructions on the Uploading Projects page.